HOME
Wall Pack LED Lights: Efficient Outdoor Lighting
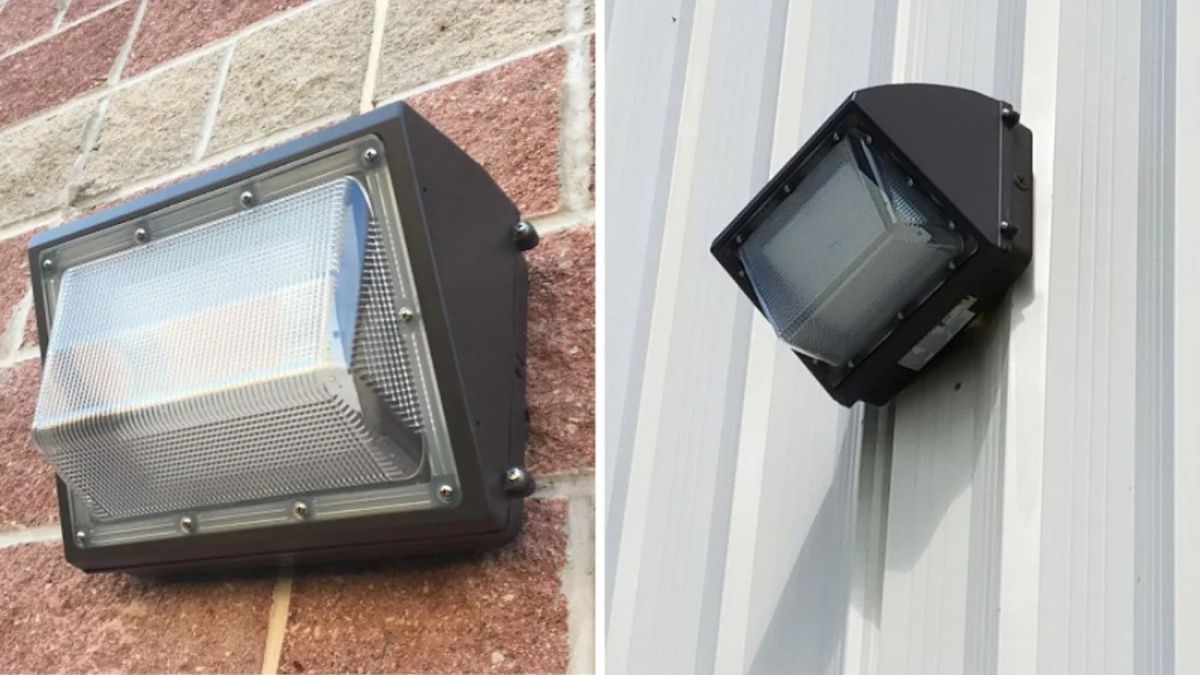
Wall Pack LED Lights are exterior lighting fixtures designed to mount directly onto vertical surfaces like walls. Typically installed on the exterior walls of buildings, these lights provide illumination for walkways, entrances, parking areas, and perimeters. The name “wall pack” refers to their compact design that packs powerful lighting capabilities into a wall-mounted unit.
Traditional wall packs used metal halide or high-pressure sodium bulbs, but modern Wall Pack LED Lights have largely replaced these older technologies. The shift to LED technology brings numerous benefits that make these fixtures more appealing for almost any outdoor lighting application.
Why Choose Wall Pack LED Lights?
The popularity of Wall Pack LED Lights continues to grow for good reasons. Here are the key advantages that make them stand out:
Energy Efficiency
LED technology uses significantly less electricity than older lighting types. Wall Pack LED Lights typically consume 50-80% less energy than equivalent metal halide fixtures while producing the same or better light output. This efficiency translates directly into lower utility bills and reduced environmental impact.
Long Lifespan
Quality Wall Pack LED Lights can last 50,000 to 100,000 hours before needing replacement. Compare this to traditional metal halide lights that might last only 10,000 to 20,000 hours. This longevity means fewer replacements and lower maintenance costs over time.
Improved Light Quality
LEDs provide cleaner, brighter illumination with better color rendering. Wall Pack LED Lights produce a more natural-looking light that improves visibility and security. Many models offer customizable color temperatures, allowing you to choose between warmer or cooler light based on your needs.
Instant On
Unlike many traditional lighting technologies that require warm-up time, Wall Pack LED Lights reach full brightness instantly when switched on. This feature is particularly valuable for security lighting or areas where immediate illumination is necessary.
Durability
Designed for outdoor use, Wall Pack LED Lights are built to withstand harsh weather conditions. They’re typically rated for extreme temperatures, moisture resistance, and impact protection. Many models feature robust die-cast aluminum housings that resist corrosion and vandalism.
Types of Wall Pack LED Lights
Wall Pack LED Lights come in various designs to suit different lighting needs:
Traditional Wall Packs
These resemble conventional HID wall packs but contain LED technology. They provide a familiar appearance while delivering the benefits of LED lighting. Traditional Wall Pack LED Lights often serve as direct replacements for existing fixtures.
Full Cutoff Wall Packs
These fixtures direct light downward and forward while minimizing upward light spillage. Full cutoff Wall Pack LED Lights reduce light pollution and comply with dark sky initiatives. They’re ideal for environmentally sensitive areas or locations where light trespass could be problematic.
Semi-Cutoff Wall Packs
Offering a balance between traditional and full cutoff designs, these fixtures limit upward light while providing wider coverage. Semi-cutoff Wall Pack LED Lights work well in areas where some ambient illumination is desirable.
Adjustable Wall Packs
These allow you to aim the light precisely where needed. Adjustable Wall Pack LED Lights feature movable heads or panels that can be positioned to target specific areas, making them versatile for various applications.
Architectural Wall Packs
Designed with aesthetics in mind, these fixtures complement building designs while providing functional lighting. Architectural Wall Pack LED Lights come in sleek, modern designs that enhance a building’s appearance during both day and night.
Key Features to Consider
When selecting Wall Pack LED Lights for your project, keep these important factors in mind:
Lumen Output
Measured in lumens, this indicates how much light the fixture produces. Wall Pack LED Lights typically range from 1,000 to 20,000+ lumens. Choose based on the area size and brightness needs. For reference:
- Small walkways: 1,000-3,000 lumens
- Building perimeters: 3,000-6,000 lumens
- Parking areas: 6,000-12,000 lumens
- Large commercial spaces: 12,000+ lumens
Wattage
This measures power consumption. While traditional lighting focused heavily on wattage, with LEDs it’s more important to consider lumens per watt (efficiency). Modern Wall Pack LED Lights deliver 100-150 lumens per watt, making even lower-wattage fixtures quite powerful.
Color Temperature
Measured in Kelvins (K), this determines how warm or cool the light appears:
- 2700-3000K: Warm white (yellowish, similar to incandescent)
- 4000-4500K: Neutral white (balanced appearance)
- 5000-6500K: Cool white (bluish, resembling daylight)
Most commercial Wall Pack LED Lights use 4000-5000K for optimal visibility, but warmer options might be preferred for residential areas.
IP Rating
This indicates protection against solid objects and moisture. Wall Pack LED Lights should have at least IP65 rating for outdoor use, meaning they’re dust-tight and protected against water jets. Higher ratings like IP66 or IP67 offer even better protection against harsh weather.
Mounting Height
Different Wall Pack LED Lights are designed for specific mounting heights. Installing at the recommended height ensures proper light distribution. Generally:
- 8-12 feet: Lower wattage (15-40W) fixtures
- 12-20 feet: Medium wattage (40-80W) fixtures
- 20+ feet: Higher wattage (80W+) fixtures
Controls and Sensors
Many modern Wall Pack LED Lights include smart features:
- Photocells automatically turn lights on at dusk and off at dawn
- Motion sensors activate lighting only when movement is detected
- Timers allow programming for specific operating hours
- Dimmers adjust brightness levels for different times or conditions
- Network connectivity enables remote management and monitoring
Installation Considerations
Proper installation ensures optimal performance of your Wall Pack LED Lights:
Location
Place fixtures at regular intervals to provide even coverage without dark spots. For building perimeters, spacing typically ranges from 15-30 feet depending on fixture output and mounting height.
Wiring
Most Wall Pack LED Lights connect to standard 120-277V electrical systems. Some commercial models also support 347-480V. Always follow local electrical codes and consider having a licensed electrician handle installation.
Height and Angle
Mount fixtures at the manufacturer’s recommended height. For adjustable models, aim the light downward at approximately 30-45 degrees for optimal ground coverage.
Weather Considerations
Ensure all connections are properly sealed against moisture. Use appropriate conduit and weather-tight fittings to protect wiring and prevent water ingress that could damage your Wall Pack LED Lights.
Applications for Wall Pack LED Lights
These versatile fixtures serve numerous purposes:
Security Lighting
Wall Pack LED Lights deter unauthorized access by eliminating dark areas around buildings. Their bright, even illumination makes surveillance cameras more effective and creates a sense of safety.
Commercial Buildings
Offices, warehouses, and retail locations use Wall Pack LED Lights to illuminate parking areas, loading docks, and building perimeters. Their energy efficiency and low maintenance make them ideal for businesses looking to reduce operating costs.
Schools and Institutions
Educational facilities rely on Wall Pack LED Lights to ensure campus safety after dark. These fixtures illuminate walkways, entrances, and common areas to create secure environments for students and staff.
Residential Applications
While traditionally associated with commercial settings, smaller Wall Pack LED Lights have become popular for homes. They provide security lighting for yards, driveways, and entryways while enhancing curb appeal.
Industrial Facilities
Factories, processing plants, and industrial complexes benefit from the durability and brightness of Wall Pack LED Lights. Their robust construction withstands harsh environments while providing necessary illumination for operations and security.
Maintenance and Care
One of the major advantages of Wall Pack LED Lights is their minimal maintenance requirements:
Cleaning
Periodically wipe fixtures with a soft, damp cloth to remove dust, dirt, and debris that can block light output. For coastal locations, cleaning may be needed more frequently to remove salt buildup.
Inspection
Annually check for loose connections, water damage, or pest intrusions. Ensure mounting brackets remain secure and that photocells or sensors operate correctly.
Replacement
Unlike traditional lighting that requires bulb changes, LED fixtures typically replace the entire unit at the end of their lifespan. Budget for eventual replacement, though this might be 10-20 years after installation.
Environmental Impact
Wall Pack LED Lights contribute to sustainability efforts in several ways:
Energy Conservation
Their high efficiency reduces electricity consumption, lowering carbon emissions associated with power generation. A commercial property can significantly reduce its carbon footprint by switching to LED lighting.
Reduced Light Pollution
Full cutoff Wall Pack LED Lights minimize upward light spillage that contributes to sky glow. This helps preserve natural darkness for wildlife and astronomical viewing.
Fewer Disposals
The long lifespan of Wall Pack LED Lights means fewer fixtures entering landfills over time. Additionally, many LED components are recyclable, further reducing environmental impact.
No Mercury
Unlike fluorescent or HID lamps, LEDs contain no mercury or other hazardous materials, making them safer for the environment when eventually disposed of.
Cost Considerations
While Wall Pack LED Lights typically cost more upfront than traditional lighting, their economics make sense in the long run:
Initial Investment
Quality Wall Pack LED Lights range from $50 for basic residential models to $500+ for high-output commercial fixtures. This initial cost is higher than equivalent traditional lighting.
Return on Investment
The energy savings from Wall Pack LED Lights typically provide a return on investment within 1-3 years for commercial applications. After this period, the ongoing savings contribute directly to reduced operating costs.
Incentive Programs
Many utility companies and government agencies offer rebates or incentives for LED lighting upgrades. These programs can significantly reduce the initial investment cost of Wall Pack LED Lights.
Lifetime Value
When factoring in energy savings, reduced maintenance, and longer lifespan, Wall Pack LED Lights provide substantial lifetime value compared to traditional lighting technologies.
Conclusion
Wall Pack LED Lights represent a significant advancement in outdoor lighting technology. Their combination of energy efficiency, durability, and high-quality illumination makes them an excellent choice for virtually any exterior lighting application. Whether you’re upgrading existing fixtures or planning a new installation, these versatile lights deliver practical benefits that justify their growing popularity.
As LED technology continues to advance, Wall Pack LED Lights will likely become even more efficient and feature-rich. For property owners and managers looking to reduce costs while improving lighting quality and security, these fixtures offer a compelling solution that pays dividends for years to come.
Efficient and safe air compressor lines are the backbone of multiple industrial environments, from manufacturing floors to automotive shops. Routine upkeep ensures a consistent production process and helps avoid unexpected breakdowns that can halt operations. For businesses in humid regions or challenging environments, such as the Southeast, working with a dedicated regional service provider like air compressor line Jacksonville, FL can help you spot location-specific issues and optimize your setup for local conditions.
Staying proactive with regular maintenance offers substantial benefits. Immediate savings on energy costs, improved system reliability, and a safer workplace all contribute to long-term value. Addressing the root causes of efficiency loss from air leaks to poor intake air quality can extend the lifespan of your equipment and minimize both scheduled and unscheduled downtimes.
When employees know how to identify early warning signs of trouble and are trained in best practices, they also become an integral part of the maintenance process. Thorough education, paired with proven protocols, fosters a culture of accountability and diligence within your facility.
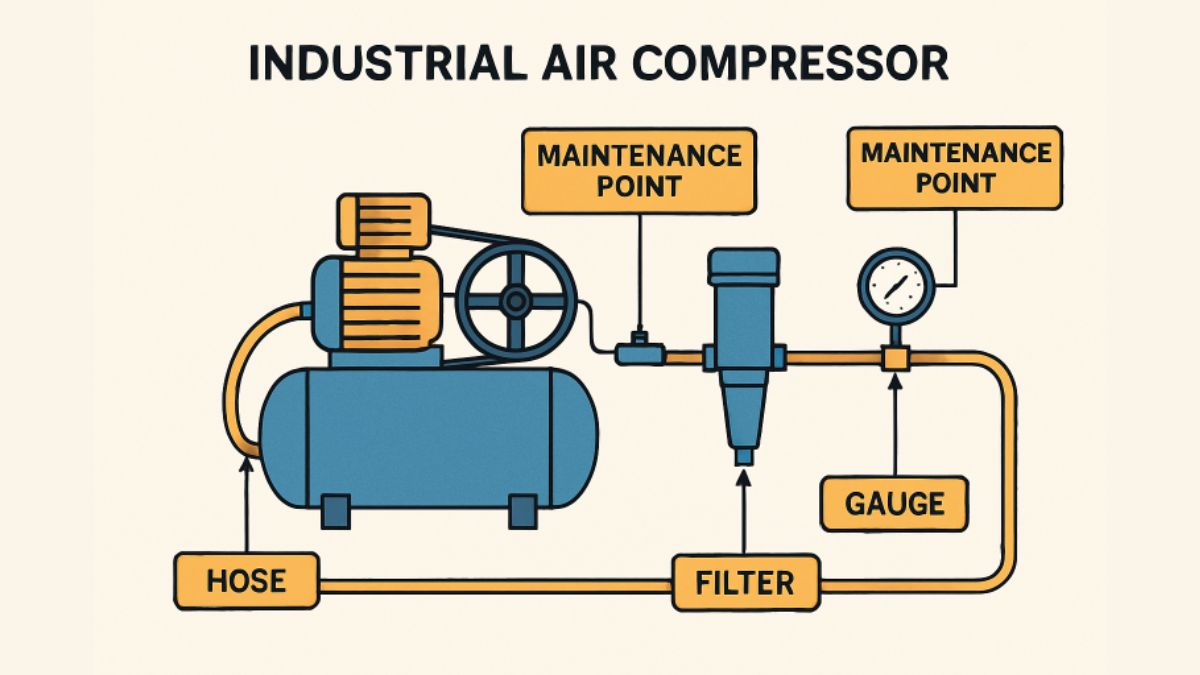
Industrial air compressor systems have complex requirements, but modern techniques and monitoring systems make achieving optimal performance easier than ever. From electronic monitoring to advanced filtration, the right combination of tools and habits keeps your system running at its best while minimizing worker risk and reducing operational costs.
Regular Inspection of Air Compressor Lines
Consistent, routine inspections are essential to spot problems before they interrupt production. Check hoses, tubing, valves, and connections for signs of wear, abrasion, corrosion, and cracks. Even in high-traffic facilities, minor damage can escalate rapidly if left unchecked. Inspection logs help pinpoint trends over time and identify recurring trouble spots, ensuring you replace or repair critical components before they fail completely.
Addressing Air Leaks Promptly
Few issues impair air compressor efficiency as much as unaddressed air leaks. Not only do leaks force your compressor to work harder, but they also increase energy costs, sometimes by as much as 20 to 30 percent, according to studies by the U.S. Department of Energy. Implementing a systematic leak detection program reduces wasted output and dramatically lowers operating costs. Regularly monitoring system pressure, using ultrasonic leak detectors, and training staff to listen for tell-tale hissing sounds are best practices that make a measurable impact.
Maintaining Optimal Air Intake Quality
Intake air quality is a critical determinant of both performance and equipment longevity. Three key elements impact air intake:
- Temperature: Compressing cool air is more efficient; ensure your intake draws from areas away from heat sources.
- Composition: Prevent intake of dust, dirt, or fumes by regularly inspecting and replacing intake filters. Clean air prevents internal contamination and abrasive wear within the compressor system.
- Humidity: High moisture promotes corrosion, rust, and system inefficiencies. In regions with high ambient humidity, deploying desiccant dryers or cooling systems to reduce moisture is especially important.
High-quality intake safeguards reduce long-term repair costs and bolster system efficiency, ensuring the compressor outputs air that meets your application’s requirements.
Ensuring Proper Lubrication
Moving parts inside air compressors require regular lubrication to mitigate friction and heat. Lack of proper lubrication accelerates component degradation, causes overheating, and can lead to catastrophic failure. Always use lubricants specified by the equipment manufacturer, and establish a routine schedule for checking and topping off levels. Proper lubrication also contributes to quieter operation and reduces the likelihood of unexpected mechanical issues.
Monitoring System Pressure and Temperature
Installing reliable gauges and sensors to monitor pressure and temperature provides instant feedback on system health. Abnormally high or low readings may signal operational issues like partial blockages, excessive moisture, leaking valves, or motor malfunctions. Digital monitoring systems can deliver real-time alerts, giving your team a head start on troubleshooting. Keep in mind that maintaining stable working environments maximizes equipment life and keeps operators safe.
Implementing Effective Filtration Systems
Filtration is your first line of defense against internal contamination. High-quality air filters remove particulates, oil vapor, and other pollutants from the air stream. Dirty filters cause airflow restrictions, reducing pressure, increasing operating costs, and placing undue strain on the compressor. Replace filters based on the manufacturer’s schedule or as soon as differential pressure readings begin to climb. Experienced operators understand that neglecting filtration can impair not only the compressor but also tools, actuators, and other devices further down the line.
Training Personnel on Best Practices
Even the best-maintained equipment is only as reliable as the staff who operate it. Comprehensive training programs empower personnel to understand the critical functions of air compressor lines, conduct routine maintenance checks, and respond rapidly to potential threats. Well-trained staff foster a proactive mindset, ensuring that signs of distress are addressed before they become incidents.
Final Thoughts
Long-term safety and efficiency in air compressor lines depend on a commitment to proactive maintenance, staff training, and the regular adoption of best practices. Start with timely inspections, invest in advanced monitoring and filtration, and keep personnel up to date. By implementing these measures, you will reduce unplanned downtime, optimize system efficiency, and protect your investment in essential equipment.

Commercial construction projects require careful planning, as each decision made in the early stages can impact the project’s success far into the future. Whether you are breaking ground on a retail space, office complex, or pursuing commercial rebuilds Maryland, it’s essential to balance vision with strategy from day one. The steps you take before construction begins are often the most influential, affecting everything from costs and timelines to occupant satisfaction.
By addressing critical elements such as budgeting, scheduling, team selection, and compliance with regulations, you can improve the likelihood of delivering a project that meets both business goals and stakeholder expectations. Considering environmental impact, future adaptability, and a collaborative approach will also help ensure the property’s long-term value and reputation.
Commercial construction projects can be particularly complex, involving multiple stakeholders, tight deadlines, and substantial financial investment. Proactive planning and a holistic viewpoint can make the difference between a project that flounders and one that exceeds expectations. According to Forbes, strategic foresight and flexibility are crucial to overcoming the numerous challenges prevalent in today’s construction environment.
Establish a Realistic Budget and Timeline
Your construction budget is more than just a list of costs—it’s a dynamic document that guides the entire project. Begin by accounting for materials, labor, permits, fees, and contingencies for unforeseen events such as market fluctuations or adverse weather. Allocating a contingency fund of 5-10% is a prudent move that allows projects to weather unexpected costs without jeopardizing completion.
Crafting a realistic timeline is equally essential. Take the time to assess how external factors, such as supply chain complications or regulatory holdups, may introduce delays. Regular progress reviews and built-in schedule buffers help maintain momentum, making it easier to adapt should delays arise.
Assemble a Competent Project Team
Success in commercial construction hinges on the expertise brought by your team. Select reputable architects, engineers, contractors, and specialists whose experience aligns with your project’s complexity. Equally important is fostering a collaborative environment that encourages open communication, as this helps reduce misinterpretations and mistakes that could inflate budgets or extend timelines.
Formalizing roles and responsibilities and holding regular coordination meetings will keep everyone aligned and efficiently move the project forward. As highlighted by Construction Dive, frequent communication and clearly defined processes are proven to reduce costly rework and boost productivity.
Understand Zoning Laws and Obtain Necessary Permits
Before launching construction, ensure compliance with all relevant zoning laws and secure the necessary permits. Local government regulations vary and may restrict aspects of your design, use of the property, or even the materials allowed. Early engagement with municipal authorities can reveal unexpected requirements and help prevent violations that lead to fines or costly design changes midway through the project.
Prioritize Functionality and Design
The balance of visual appeal and practical utility is central to a successful commercial space. Consider how layout decisions will support everyday operations, accessibility, and occupant comfort. Factors such as lighting, acoustics, and spatial flexibility can drastically impact productivity and make a property more attractive to tenants or clients. Integrating features for ADA compliance ensures inclusivity and maximizes usability.
Incorporate Sustainability and Energy Efficiency
Sustainable building practices reduce long-term operational costs and environmental impact. Implementing measures like high-efficiency HVAC systems, low-flow fixtures, LED lighting, and solar panels reflects a commitment to green building, which can also attract tenants seeking environmentally conscious workspaces. Utilizing recycled materials and pursuing certifications like LEED can enhance market appeal and demonstrate broader corporate responsibility.
Achieving energy efficiency is not only an investment in the planet, but it can also result in utility incentives or rebates, thereby reducing overall expenditures. As detailed by the U.S. Environmental Protection Agency, integrating lifecycle thinking into construction helps promote sustainability in every phase of the project.
Plan for Future Growth and Flexibility
Design flexibility enables a commercial property to adapt as business requirements evolve or market conditions shift. Versatile spaces, modular walls, and adaptable utility systems make it easy to reconfigure workplaces or expand with minimal disruption. This future-resilient approach not only supports organic growth but can prolong the viability of a building for new uses over time.
Ensure Quality Control and Safety Measures
Quality assurance begins before ground is broken and continues throughout the construction process. Implement standardized best practices for inspections and testing, and monitor for alignment with project specifications and safety codes. Enforcing occupational health and safety standards, conducting regular training, and maintaining transparent channels for workers to report issues help protect both people and the project’s reputation. The Occupational Safety and Health Administration (OSHA) provides valuable resources for maintaining industry safety standards.
Engage with the Community
Proactive engagement with neighboring communities can accelerate project approvals and foster goodwill. Hosting public input sessions or updating stakeholders through local news channels demonstrates commitment to positive relationships and social responsibility. Collecting and responding to feedback helps mitigate concerns and encourages project acceptance, reducing potential friction with local stakeholders.
Final Thoughts
Successful commercial construction projects are rooted in thoughtful planning, regulatory diligence, and ongoing collaboration. By considering each essential factor—from budgeting and personnel to sustainability and community engagement—you can deliver outcomes that withstand today’s challenges while preparing for tomorrow’s possibilities.

Horse jumping is a thrilling equestrian sport that combines athleticism, agility, and trust between horse and rider. However, with the excitement comes a certain degree of risk, which makes safety an essential factor to consider every time a horse and rider enter the arena or take on a new course. Over the years, the introduction of innovative materials and modern safety features has significantly contributed to transforming training spaces into more secure environments, all while maintaining the challenging spirit these jumps are meant to foster. For riders, trainers, and stable owners considering the addition of new horse jump designs—especially those seeking to strike a balance between exhilaration and well-being—it’s vital to understand the most effective construction methods available today. The right approach can keep both horses and humans safe, minimizing the likelihood of injury and supporting long-term participation in the sport.
By leveraging creative building techniques and selecting suitable materials, it’s possible to prevent many of the common injuries and accidents often associated with traditional horse jumps. These strategies not only prioritize safety but also frequently reduce overall costs by utilizing readily available and affordable resources. Additionally, many of these methods promote sustainability by reusing or repurposing everyday items, which is an increasing concern in contemporary equestrian practice. Whether you are a professional trainer responsible for a bustling academy or a passionate DIY enthusiast constructing obstacles in your own backyard, the commitment to building safer jumps is a significant contribution to a broader culture of responsible and sustainable equestrianism. In turn, this encourages inclusivity and lifelong enjoyment for riders at every level, from those just starting to those mastering advanced courses.
Utilizing Plastic Barrels for Versatile Jump Designs
Plastic barrels offer a practical and innovative alternative to traditional jump wings and fillers, providing excellent strength, weather resistance, and versatility at a fraction of the expense of commercial materials. Filled with sand or water, these sturdy barrels remain in place even when horses brush past or knock them, ensuring stability during use. Their surfaces can be easily cleaned, which helps reduce risks associated with slippery or dirty setups. Jump cups explicitly designed for barrel use are readily available. They can be attached directly to the sides, ensuring that jump rails are securely held but can dislodge safely in the event of force. This method enables quick and frequent course modifications, allowing for easy tailoring of exercises to individual horses and riders, and for enhancing the training routine without the need for multiple sets of heavy equipment. The flexibility plastic barrels provide is key for instructors working with students of diverse skills and confidence levels. To gain more insight on effective, budget-friendly materials and straightforward construction methods, have a look at the tips from Horse & Hound.
Repurposing Wooden Pallets for Customizable Jumps
When it comes to resourcefulness and sustainability, wooden pallets stand out as one of the best materials for building horse jumps. Readily available from warehouses, stores, or community giveaways, these pallets can easily be transformed into jump standards, gates, or fillers. Before integrating a pallet into your jump, a thorough safety check is crucial—ensure that all nails, loose boards, and potential splinters are removed. Sanding down any rough edges significantly minimizes injury risk for both horse and rider. Once prepped, wooden pallets can be customized for specific courses or themes: painting them with bright, horse-safe colors or adding weather-resistant decorations increases their visibility and attractiveness, keeping both horses and riders engaged and alert. Furthermore, since pallets can be easily reconstructed or combined, they allow the creation of jumps with varying heights, widths, and complexity; this flexibility is particularly valuable for accommodating a range of skill levels and promoting gradual, safe progression in training routines.
Incorporating Rounded Edges and Collapsible Components
Paying attention to the finer details of construction can make a significant difference in safety outcomes. Jumps with sharp or pointed corners have historically caused injuries when horses graze or knock against them. By intentionally designing jump elements with rounded edges—either by sanding wood, using PVC piping, or fitting protective edge covers—you greatly reduce the likelihood of cuts, bruises, or more serious trauma. Even more impactful are collapsible components, such as breakaway cups, which are engineered to release their contents upon significant impact rather than remaining rigid. This “give” can help prevent falls or entanglement and is especially important when working with green horses or novice riders. Collapsible features are now commonly found in modern jumping equipment, particularly for cross-country and eventing, where obstacles often require a solid-looking yet safer construction. For a look at the latest developments in jump safety and construction techniques, check out The Chronicle of the Horse for articles and updates from leading industry experts.
Implementing Frangible Pins for Enhanced Safety
One of the most significant safety advances in recent years has been the widespread adoption of frangible pins in competitive horse jumping. These specialized pins are engineered to break or collapse under the weight or force of a horse hitting a jump, causing potentially dangerous solid elements to fall away harmlessly. This dramatically reduces the risk of a rotational fall, which is one of the most serious types of accidents in jumping disciplines, especially eventing. The use of frangible technology is now considered best practice for permanent jumps and is increasingly being adopted by safety-focused facilities and competitions. By integrating frangible pins, builders create an extra layer of safety that can mean the difference between a close call and a catastrophic injury. For a closer look at how frangible pins and innovative safety systems are making an impact, the United States Eventing Association provides guidelines, technical documents, and real-world case studies to help builders and trainers effectively apply these concepts.
Regular Maintenance and Inspection of Jumps
Safety is not just a matter of initial construction but ongoing diligence. Even the best-designed jumps lose their integrity over time due to exposure to weather, repeated use, or accidental knocks. Establishing a regular maintenance and inspection routine is key to ongoing safety. Take the time to examine all surfaces for loose parts, worn areas, or sharp protrusions. Wooden jumps should be resealed or repainted with non-toxic, weather-resistant products to ensure they withstand rain and sun exposure without becoming brittle or splintered. Metal components must be inspected for signs of rust, fatigue, and loose connections. This commitment to upkeep helps maintain confidence among riders and horses alike and protects the investment made in equipment by extending its usable life.
Customizing Jumps to Suit Various Skill Levels
One significant advantage of modern DIY or custom-built jumps is adaptability. Adjustable and modular designs empower trainers and riders to alter jump height, width, and challenge quickly; stackable fillers, sliding or removable jump cups, and interchangeable decorative panels make these adjustments both safe and straightforward. This adaptability is indispensable in lesson programs, clinics, or any setting serving a range of ages and abilities. Starting with lower, less complex jumps helps foster confidence in new riders and green horses, while more experienced jumpers can be safely challenged with higher, wider, or uniquely configured obstacles. The ability to fine-tune jumps as skills progress supports steady learning and tailors the risk to the rider’s level. For creative ideas on bringing modular designs to your arena or field, inspiration is only a click away—publications like Horse Illustrated frequently feature projects for all experience levels.
Conclusion
Building safer horse jumps is far more than simply assembling obstacles—it’s a thoughtful process that must balance creativity, responsibility, and practicality. By using accessible, budget-friendly materials, incorporating advanced safety features, customizing designs for all ability levels, and maintaining a commitment to ongoing upkeep, trainers and riders can create a safe and dynamic training space that fosters progress and enjoyment. Ultimately, these innovations enrich the equestrian experience and help ensure that both horses and their riders can confidently pursue their sport for years to come.
-

 FASHION2 years ago
Elegant Winter Party Style: Trendy Long-Sleeve Dresses and Essential Hair Care Tips
-

 FASHION1 year ago
Top Kids Clothing Trends for 2025 – What’s In Style This Year?
-

 HOME1 year ago
Weather Related Event Closings Explained
-

 HOME1 year ago
Exploring the World of TG Tube: A Comprehensive Guide
-

 AUTOMOTIVE1 year ago
Mitsubishi Pajero 3.0 V6 – Specs, Performance & Guide
-

 BUSINESS2 years ago
HOW TO SHOP GOODWILL OUTLET STORE
-

 EDUCATION1 year ago
Can You Wear a Different Coloured Contact Lens in Each Eye? The Science Behind Mismatched Vision
-

 HOME1 year ago
TributePrintedPics Review: A Deep Dive into Quality, Design, and Customer Experience