HOME
Wild Words: Unraveling New Animal Homophone You Didn’t Know Existed

Language is a fascinating puzzle, full of quirks and surprises. One of its most playful features is homophones—words that sound alike but have different meanings. They can add a delightful twist to our conversations and writing, often leading to humorous misunderstandings or clever wordplay.
Now, imagine this fun with animals! The animal kingdom has its own set of unique homophones waiting to be discovered. From familiar pets to exotic creatures, these words add richness to our vocabulary while sparking curiosity about language itself.
Get ready as we dive into the wild world of new animal homophone you probably never knew existed. Let’s unleash some linguistic joy!
Homophones in the animal kingdom
Homophones are everywhere, even in the animal kingdom. These fascinating word pairs sound alike but have different meanings. They add a playful twist to language.
Consider the classic pair: “ant” and “aunt.” The tiny insect shares its name with a family member, creating fun opportunities for puns and jokes.
Then there’s “deer” and “dear.” One refers to a graceful creature roaming the woods, while the other expresses affection. Such duality enriches our conversations.
Lesser-known examples also exist. How about “gnu,” which is an African antelope? It sounds just like “new,” bringing fresh ideas into discussions about wildlife conservation or nature documentaries.
These homophones create unique connections between words and their meanings, reflecting how language evolves alongside us as we navigate daily life.
Examples of common animal homophones (e.g. ant/aunt, deer/dear)
Common new animal homophone add a playful twist to our language. They often create confusion, but they can also inject humor into conversations.
Take “ant” and “aunt,” for instance. While one refers to the industrious little insect we see in gardens, the other is a beloved family member who may show up with cookies in hand.
Another classic pair is “deer” and “dear.” The first brings to mind graceful creatures roaming through forests. The second expresses affection—perfect for those heartfelt letters or casual chats.
These pairs remind us that words can sound alike yet hold different meanings. This duality enriches our communication and sparks curiosity about language itself. Exploring these examples makes you appreciate how diverse our vocabulary truly is while having fun along the way.
Uncommon or lesser-known animal homophones (e.g. gnu/new, sloth/clothe)
When we dive into the world of lesser-known animal homophones, a few intriguing pairs emerge. Take “gnu” and “new,” for instance. This African antelope’s name sounds just like something fresh or recently made. Imagine a new gnu grazing in the grasslands!
Another interesting pair is “sloth” and “clothe.” While sloths are famously slow-moving creatures, the word “clothe” refers to putting on garments. Picture a sloth dressed in its favorite outfit — now that’s an amusing mental image!
These words may not pop up as often in conversation, but they can add flair to your language. Using them creatively can spark curiosity and laughter among friends. So next time you mention a gnu or talk about how to clothe your pet, remember these delightful homophonic connections!
The origin and evolution of these words
The journey of homophones in the animal kingdom is fascinating. Many of these words have roots that trace back to Old English or even further into ancient languages. They began as distinct entities, each serving a specific purpose in communication.
As languages evolved, sounds shifted and meanings began to intertwine. This led to pairs like “deer” and “dear,” which sound alike but carry different implications.
Cultural exchanges also played a role in shaping these terms. When new species were discovered or introduced through exploration, their names often morphed alongside existing vernaculars.
Over time, playful usage emerged as people started using homophones for puns or jokes. These linguistic quirks add charm and depth to language while enhancing our understanding of the natural world around us. Each pair tells its own story rooted deeply within human history and interaction with animals.
How to use these words in everyday speech and writing
Using new animal homophone can add a playful twist to your conversations and writing. Imagine crafting a light-hearted message to a friend about an “aunt” who loves to watch the “deer” in her garden. It not only conveys your message but also adds charm.
When discussing topics related to nature or wildlife, consider using lesser-known examples like “gnu” and “new.” This creates intrigue while demonstrating your vocabulary prowess.
In storytelling, blending these words enriches character dialogue. A character could express their fondness for the “sloth,” jokingly mentioning how they enjoy lounging just as much as their pet does with its “clothe.”
Social media posts thrive on wordplay. Puns featuring new animal homophone can capture attention and encourage engagement from followers, making them shareable content that resonates with audiences of all ages.
Conclusion: Expanding your vocabulary with wild
Language is a living, breathing entity. It evolves and transforms with the world around us, often in surprising ways. Exploring new animal homophones opens up a treasure trove of vocabulary that can enrich your speech and writing.
By incorporating these playful words into your daily conversations or creative endeavors, you not only enhance your language skills but also spark curiosity among those who hear them. Imagine discussing a “gnu” while seamlessly tying it to something “new.” Or sharing an anecdote about how you’d never “deer” (dare) to wear anything too flashy on a visit to see your beloved “aunt.”
Taking the time to understand these unique connections encourages deeper engagement with language. So go ahead—experiment with wild words! Use them in stories, jokes, or even casual chats over coffee. Each new term you embrace adds color and depth to communication.
As you embark on this journey through the linguistic jungle filled with whimsical animal pairs, remember that every word has its own story waiting to be told. Expand your vocabulary and enjoy the vibrant tapestry of language that surrounds us all!

Creating an outdoor space that feels both inviting and harmonious with its surroundings helps foster a sense of relaxation, balance, and visual cohesion. The secret is blending furniture and accessories inspired by the natural world, so your backyard or patio feels like a tranquil retreat. Embracing materials that look and feel authentic, from weathered woods to creative custom concrete furniture, can transform any exterior area into a serene extension of your home.
Nature-inspired furniture sets the tone for an outdoor environment where comfort and sustainability work hand in hand. Plants, textures, and earthy colors combine with thoughtfully chosen pieces to create a seamless transition between indoors and out, giving you more opportunities to relax, dine, socialize, and unwind amid nature’s backdrop.
Embracing Natural Materials
Natural materials are the foundation of an outdoor space that truly blends into its environment. Reclaimed teakwood, rattan, bamboo, and stone are among the most popular choices. These materials are durable, often sustainably sourced, and weather beautifully, developing a character that further enhances your furniture’s appeal over time. The Nick Williams Longridge Furniture Collection, for example, uses reclaimed teak from vintage bridges and barns, ensuring each piece has a unique history and patina that elevate its charm. This focus on authenticity brings an unmatched sense of place and connection to nature.
Integrating Organic Forms
Beyond material choice, the shapes and silhouettes of your furniture play a major role in establishing an organic, relaxing mood. Some designers take cues directly from nature, opting for fluid lines and curved forms that mimic the gentle irregularity of tree branches, river stones, or root systems. The ‘Root Bench’ exemplifies this approach, providing a welcoming communal space that encourages gathering and interaction. Instead of hard right angles and engineered profiles, prioritize pieces with rounded edges, asymmetrical details, and sculptural profiles to achieve this effect.
Incorporating Textural Elements
Texture is essential for making the outdoors feel as refined and comfortable as your indoor living spaces. Incorporating bouclé, linen, woven grasses, or chunky knits as upholstery or accent elements adds tactile richness and visual interest. Outdoor bouclé, a high-pile, soft looped fabric, is particularly on-trend, introducing cozy softness to garden furniture without sacrificing durability or resilience to the elements. By layering textures, you create depth and keep your outdoor arrangement visually dynamic even with a neutral palette.
Choosing Earthy Color Palettes
Color selection significantly affects mood and coherence in outdoor areas. Earthy tones, like terracotta, sage green, muted ochre, and coffee brown, draw from the hues of soil, stone, foliage, and sunlight. For instance, design icon Claudia Schiffer’s patio features classic wooden Adirondack chairs with soft brown and olive accents, a look set to become increasingly popular as homeowners gravitate towards organic palettes that feel both up-to-date and timeless. This color strategy balances minimalist forms with warmth, inviting relaxation and togetherness in the open air.
For further expert advice on incorporating natural color palettes into your outdoor or garden design, consider House Beautiful’s coverage of current trends and strategic color ideas that work in all climates.
Prioritizing Sustainability
Environmentally conscious consumers increasingly value outdoor furniture manufactured using eco-friendly processes and materials. Not only does this reduce the environmental footprint of your home, but it also adds a story and sense of purpose to each item. Companies like Loll Designs are leading the way, launching patio and lounge collections crafted from recycled materials and produced with minimal waste. Partnering with renowned design studios, they prove that sustainable choices can be strikingly stylish and practical.
Enhancing with Natural Accessories
The right accessories anchor your furniture and boost the sensory richness of your outdoor sanctuary. Consider incorporating woven rugs or mats, stone or terra cotta planters, lanterns crafted from bamboo or weathered wood, and decorative outdoor cushions in earthy fabrics. These accents round out a cohesive look, make pathways more inviting, and offer practical touches like extra comfort, light, and storage. Nature-inspired lighting and tableware can also further enhance the mood, especially for outdoor dining or evening relaxation.
Creating Multi-Functional Spaces
Modern lifestyles demand versatility. A well-designed garden or patio should perform multiple roles throughout the day and week. Modular furniture makes it easy to rearrange settings for dining, lounging, or entertaining. Incorporate built-in planters or benches to maximize space, and use folding or stackable pieces to transition from a quiet reading nook in the morning to a bustling space for guests at night. Thoughtful placement of greenery adds privacy and delineates “rooms” within the outdoors, ensuring both functionality and a natural feel.
Conclusion
A nature-inspired outdoor retreat is more than just a trend; it is an intentional design philosophy that elevates daily living by connecting home life with the effortless beauty of the outdoors. By choosing quality materials, soft textures, soothing colors, and sustainable options, and by layering personalized accessories, you can craft a sanctuary that nurtures both body and mind in every season.

Industrial chemical blending forms the foundation of many manufacturing processes, shaping the products that people rely on daily. From pharmaceuticals to consumer goods, chemical blending is crucial for both quality and consistency. Companies known as Chemical Blenders play an essential role in this landscape, offering expertise and innovation to meet the demands of diverse industries.
Blending is not just about mixing substances. It is a precise science that ensures every batch meets established standards for safety, efficacy, and performance. This attention to detail enables manufacturers to deliver reliable products to consumers, which builds trust and drives repeat business across the marketplace.
The Importance of Chemical Blending in Manufacturing
Chemical blending involves carefully combining chemical substances to formulate products with desired properties, textures, and effectiveness. This critical step determines whether a product meets industry specifications, regulations, and customer expectations. For example, in the pharmaceutical sector, blending must be precise to ensure that each tablet or capsule contains the exact medication dosage, directly influencing consumer safety and therapeutic outcomes.
Beyond the pharmaceutical industry, chemical blending underpins everything from agricultural chemicals to food production. It allows manufacturers to scale operations while maintaining strict batch-to-batch consistency, which is essential for sensitive applications or stringent regulatory controls.
Applications Across Various Industries
The impact of industrial chemical blending reaches into nearly every sector, making it a truly versatile process:
- Pharmaceuticals: Blending is central to the uniformity and safety of medications, ensuring patients receive the intended dose.
- Agriculture: Fertilizers, pesticides, and herbicides require specific blends for different crop types; custom formulations can directly improve yields and crop health.
- Consumer Goods: The blending of household cleaners, cosmetics, and food additives must be exact to guarantee performance, safety, and compliance.
This broad range of applications highlights why industrial chemical blending is regarded as foundational for modern living and industrial growth. Manufacturers depend on blending to introduce new products, optimize existing formulas, and adapt to market changes.
Technological Advancements in Chemical Blending
Recent years have seen remarkable strides in the technology powering chemical blending. Advanced blending systems now utilize process automation, robotics, and artificial intelligence to monitor, control, and optimize production lines. Technologies such as real-time analytics, automated batch tracking, and digital sensors help companies reduce human error, increase speed, and deliver predictable results, as Forbes outlines.
For instance, automated dosing equipment ensures that even the smallest components are measured correctly, while process control software can adjust parameters instantly based on feedback data. The implementation of AI and machine learning reduces waste and improves process repeatability, lowering costs and enhancing quality across manufacturing settings.
Challenges in Chemical Blending Processes
Despite ongoing technological improvements, several persistent challenges can impact the effectiveness and safety of chemical blending operations:
- Quality Control: Maintaining consistency across batches is labor-intensive and requires ongoing process verification, documentation, and testing. Small deviations can compromise product safety and performance.
- Safety Concerns: Many chemicals require careful handling to prevent exposure or accidents. This requires robust personal protective equipment, staff training, and emergency protocols.
- Environmental Impact: Managing the storage, use, and disposal of chemicals is a major responsibility. Improper handling can result in hazardous emissions or contamination, making compliance with environmental standards crucial.
Sustainability and Environmental Considerations
Sustainability is becoming central to industrial chemical blending, with companies adopting greener practices. Several promising trends are shaping the future of chemical blending. Users are now incorporating robotics to embrace automation and digitalization further, and to adopt circular-economy principles to reduce the industry’s environmental footprint. For example, Forbes has reported on the chemical sector’s efforts to lower carbon emissions and enhance sustainability.
The adoption of green chemistry enables companies to formulate safer products with lower hazard ratings, minimize the generation of toxic byproducts, and optimize waste management across their supply chains. This holistic approach supports brand reputation while contributing to climate and ecological goals.
Future Trends in Chemical Blending
The future of chemical blending is being shaped by several promising trends. Manufacturers are expected to further embrace automation and digitalization, integrating AI and robotics to free up human resources for higher-level problem-solving and innovation. The ability to produce personalized products, such as custom pharmaceutical blends and niche consumer goods, will grow as flexible production capabilities expand.
Environmental progress will also continue, with companies leveraging sustainable materials and closed-loop systems to meet tough environmental requirements and consumer preferences. These advancements will further boost reliability and drive market growth in an adaptive, responsible manner.
Conclusion
Industrial chemical blending is at the heart of global manufacturing, supporting everything from healthcare products to food and consumer goods. As manufacturers navigate evolving technological landscapes and heightened sustainability demands, those who innovate and adopt responsible practices will set the standard for quality and reliability in the years to come.
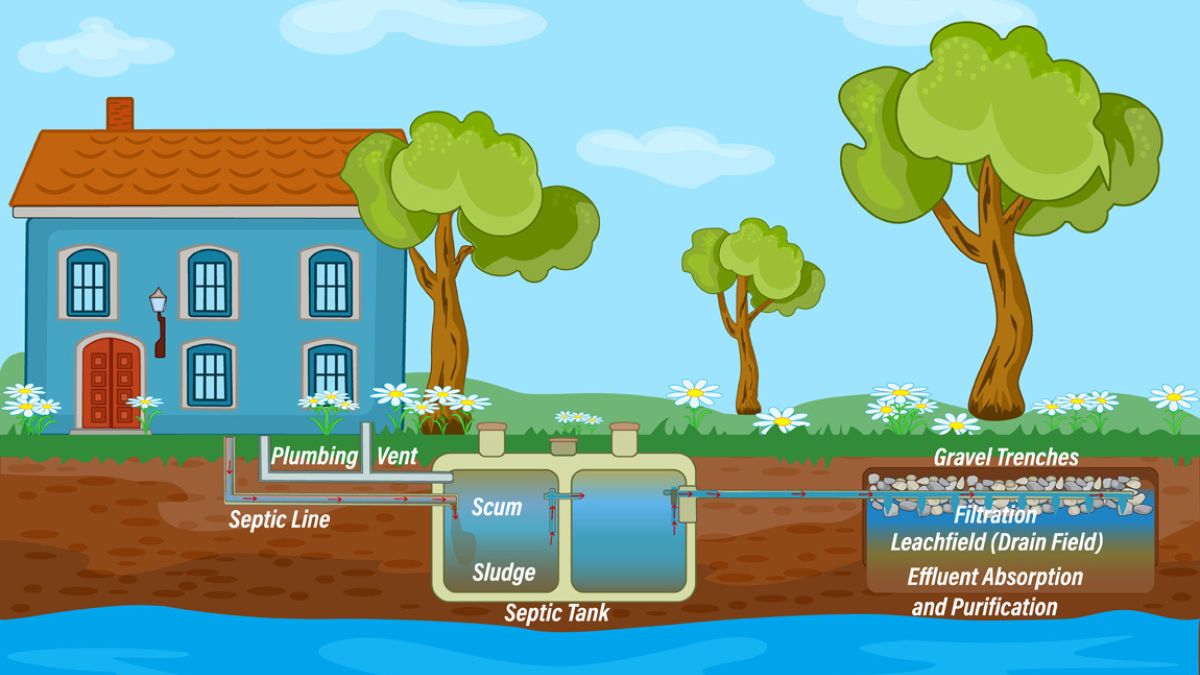
Maintaining your septic system is crucial for the health of your home and the environment. A well-maintained system can last for decades, while neglect can lead to costly repairs and environmental hazards. For residents in the Orlando area, A & L Septic Products Inc. offers comprehensive services, including septic tank maintenance Orlando FL, installation, and manufacturing of high-quality concrete septic tanks and grease traps.
Schedule Regular Inspections and Pumping
Regular inspections and pumping are vital to prevent system failures. The Environmental Protection Agency (EPA) recommends having your septic system inspected every 3 years and pumped every 3 to 5 years, depending on usage and household size. This routine maintenance helps remove sludge buildup and ensures the system operates efficiently.
If you’re unsure about the last time your tank was pumped, it’s better to err on the side of caution. Septic pros can determine the current state of your tank, evaluate sludge and scum layers, and recommend an appropriate pumping schedule aligned with your household’s habits. Keeping up with these appointments helps prevent the unpleasant surprise of backups in your sinks, toilets, or bathtubs.
Be Mindful of Water Usage
Excessive water use can overload your septic system, leading to potential failures. Implement water-saving practices such as promptly fixing leaks, installing high-efficiency fixtures, and spreading laundry loads throughout the week. These measures help maintain the balance within your septic system and extend its lifespan.
Water conservation not only supports the environment but also protects your septic system from becoming overwhelmed. Dishwashers and washing machines should be used with full loads, and showers should be kept short to limit the amount of water entering the system at once. Simple practices, such as turning off the faucet while brushing teeth and installing low-flow showerheads and toilets, can significantly reduce daily water consumption.
Watch What You Flush
Only human waste and toilet paper should be flushed down the toilet. Avoid disposing of items such as wipes (even those labeled “flushable”), feminine hygiene products, diapers, and household chemicals, as they can clog the system and disrupt the natural bacterial balance required for waste breakdown.
Kitchen sinks are another common area for misuse. Grease, coffee grounds, and food scraps should never go down the drain, as they contribute to build-up and possible clogs. Instead, dispose of food waste in the trash or a compost bin where appropriate.
Protect Your Drainfield
The drainfield is a critical component of your septic system. To protect it:
- Keep vehicles and heavy equipment off the area to prevent soil compaction.
- Plant only grass over and near the drainfield to avoid root intrusion.
- Direct rainwater and surface runoff away from the drainfield to prevent saturation.
Saturated or compacted soil can’t properly absorb and filter effluent, causing backups or pooling in your yard. It’s also wise to avoid placing structures like decks or pools near the drainfield, as this can disturb essential underground pipes and soil. Understanding exactly where your drainfield is located can make it easier to protect and maintain.
Use Septic-Safe Products
Choose septic-safe cleaning products to avoid killing the beneficial bacteria in your system. Harsh chemicals can disrupt the bacterial balance, leading to system inefficiencies and potential failures.
Liquid drain cleaners, antibacterial soaps, bleach, and strong detergents can be particularly harmful. Opt for natural or biodegradable alternatives, and always follow manufacturer recommendations for safe amounts. Those living in homes with water softeners or automatic toilet bowl cleaners should seek products specifically formulated for septic systems.
Keep Records of Maintenance
Maintain detailed records of all inspections, pumping, repairs, and any other maintenance activities. This documentation is valuable for troubleshooting issues and can be beneficial if you decide to sell your home.
These records provide a clear maintenance history that can save time and money during future appointments, and technicians can track recurring issues or changes in the system. Additionally, well-organized records reassure potential buyers that your system has been properly maintained, supporting your property’s value when it’s time to sell.
Educate Household Members
Ensure that everyone in your household understands the importance of proper septic system care. Educating family members about what can and cannot be flushed or drained helps prevent accidental damage to the system.
Clear communication and posted reminders in bathrooms and kitchens can help reinforce good habits, especially among children or guests unfamiliar with septic restrictions. Discussing septic-friendly cleaning and disposal methods as part of your household routine ensures everyone is on the same page regarding system care.
Seek Professional Assistance
When in doubt, consult with a professional. A & L Septic Products Inc., serving the Orlando, FL area, offers expert septic tank maintenance services. Their team provides comprehensive inspections, pumping, and repairs to keep your system functioning optimally.
Professionals will not only address issues when they arise but can also provide preventive guidance to maximize your system’s lifespan. They can handle situations such as unfamiliar odors, soggy patches above the drainfield, or slow-draining fixtures, all of which are signs of potential septic challenges. Scheduling routine professional check-ups and asking for personalized recommendations based on your property’s unique setup is an investment in your home’s future.
Why Septic System Maintenance Matters
Neglecting septic maintenance can lead to sewage backups, foul odors, and groundwater contamination, affecting drinking water and nearby streams or lakes. Not only do such hazards threaten your family’s health and comfort, but local authorities may also impose steep fines or require expensive remediation for environmental violations. Proper maintenance saves you money, provides peace of mind, and protects community health and local water resources.
Signs Your Septic System Needs Attention
- Gurgling sounds in plumbing
- Foul or unusual odors around the tank or drainfield
- Slow-draining sinks, tubs, or toilets
- Wet spots or lush, green grass over the drainfield
- Sewage backups in the home
If you notice any of these indicators, it’s time to schedule an inspection immediately to avoid major repairs and disruptions.
Conclusion
By following these tips and scheduling regular maintenance, you can ensure the longevity and efficiency of your septic system, protecting both your property and the environment. Routine care, ongoing education, and partnership with experienced professionals like A & L Septic Products Inc. offer peace of mind and will keep your septic system running smoothly for years to come.
-

 FASHION2 years ago
Elegant Winter Party Style: Trendy Long-Sleeve Dresses and Essential Hair Care Tips
-

 HOME1 year ago
Weather Related Event Closings Explained
-

 FASHION1 year ago
Top Kids Clothing Trends for 2025 – What’s In Style This Year?
-

 TRAVEL1 year ago
Travel Tips for Visiting Korpenpelloz: What You Need to Know
-

 HOME1 year ago
Exploring the World of TG Tube: A Comprehensive Guide
-

 EDUCATION1 year ago
Can You Wear a Different Coloured Contact Lens in Each Eye? The Science Behind Mismatched Vision
-

 AUTOMOTIVE1 year ago
Mitsubishi Pajero 3.0 V6 – Specs, Performance & Guide
-

 BUSINESS2 years ago
HOW TO SHOP GOODWILL OUTLET STORE